User and Application Management
Overview
This article covers the core day-to-day TSplus administration tasks: adding and removing user access, publishing and unpublishing applications, assigning specific apps to specific users or groups, publishing a full desktop session, and locking users down to only the applications they need. Use it as a quick reference when onboarding new users, changing access levels, or cleaning up unused accounts and applications.
Assign users or groups to applications
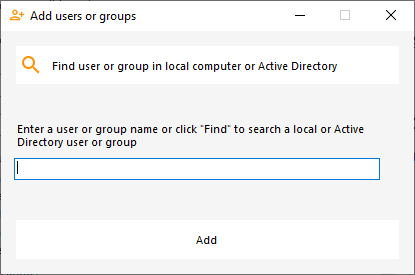
Every assignment are to be done in the right side panel of the “Applications” section of the AdminTool. This right side panel shows every users and groups currently having applications assigned.
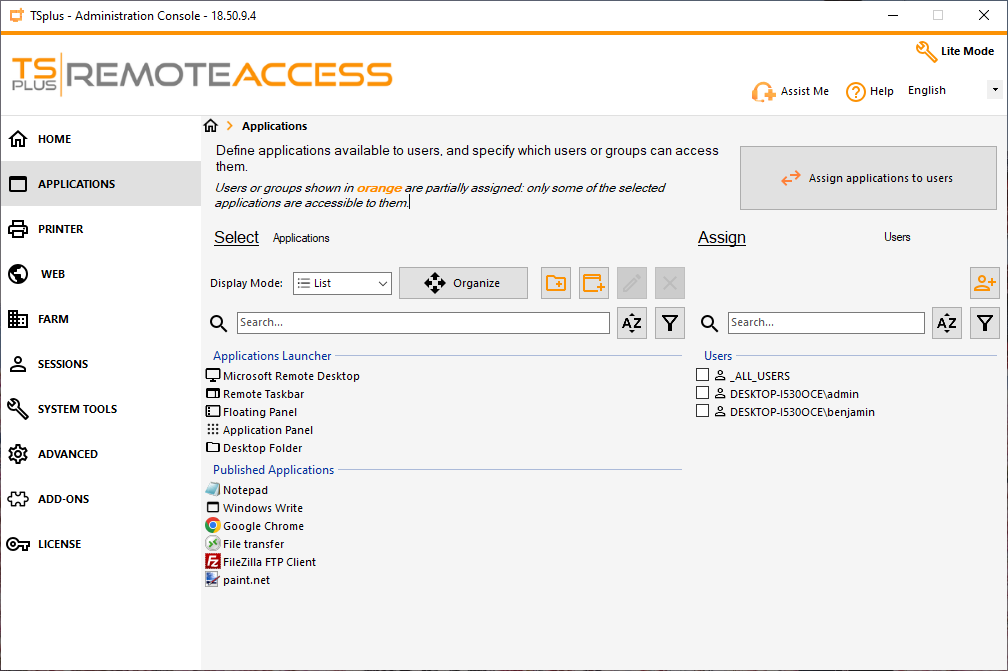
In order to assign users or groups, you will need first to add the users/groups you want to assign application for.
Add users or groups
To add users or groups, click on the “Add user” icon buttons
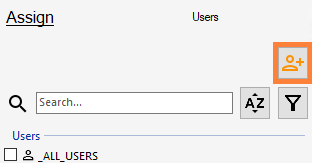
You will be greeted with this interface, allowing you to either find a user or group via the user/group picker, or directly write the name of the user/group you want to add.
Local or Active Directory users must be selected using the Find Local or Active Directory Users or Groups button.
Only external users can be entered directly into the text box.
The _ALL_USERS special username
In the list of users, you will always find available the “_ALL_USERS” user. This user is not a Windows user, but a virtual user. If you select an application and tick the “_ALL_USERS” username, then the application will be available to every users.
Assign users or groups to applications
Once users have been added, assign them applications by:
- selecting on the left panel the applications you want to assign to your user
- checking on the right panel the box next to his username to assign the selected applications to that user
Ex: if I want to assign notepad to the user “benjamin”, simply select the “notepad” application on the left, and check the box next to the username “benjamin” on the right
To unassign users, simply uncheck the box next to the user name.
This action supports multi selection
This means you can select multiple applications, and don’t have to assign application one at a time.
Assign applications to users or groups
If you would prefer to select users or groups and assign them applications, you can do so by clicking on “Assign applications to users”.
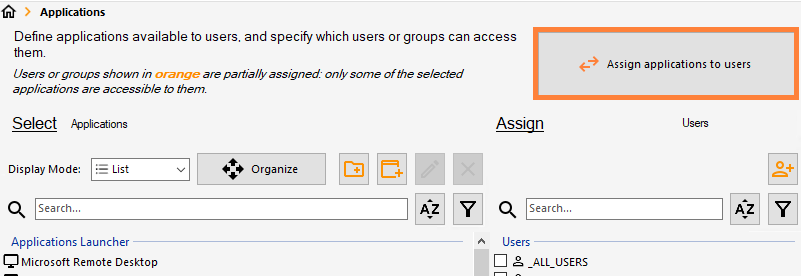
This will flip the left and right side panel.
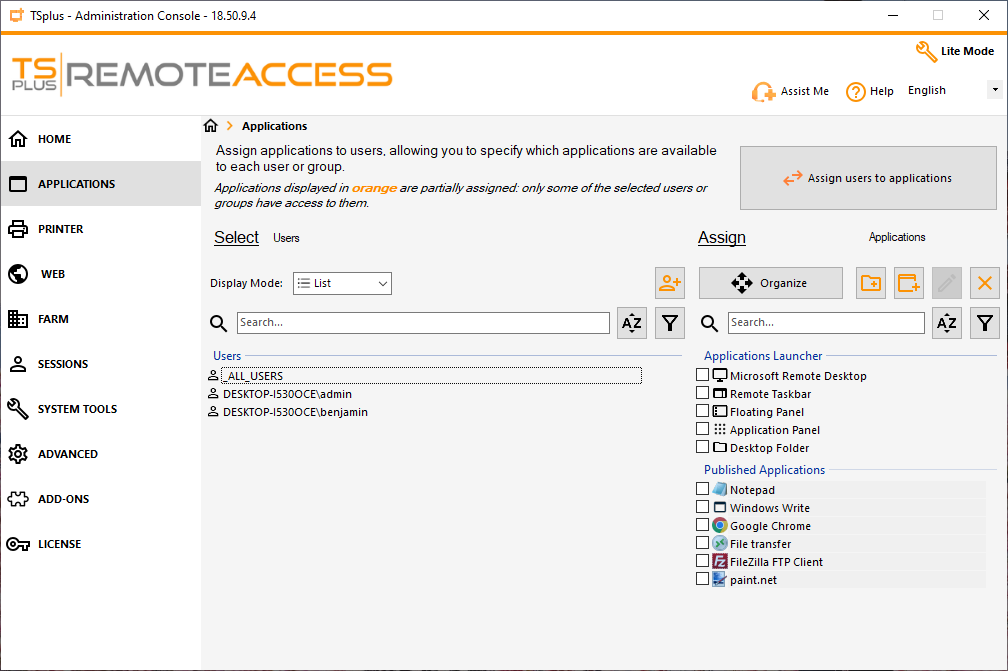
After clicking on the button, in order to assign applications to users:
- selecting on the left panel the users or groups you want to assign to your application
- checking on the right panel the box next to your application name to assign the selected users or groups to that application
Ex: if I want to assign notepad to the user “benjamin”, simply select the user “benjamin” on the left, and check the box next to the application name “notepad” on the right
To unassign applications, simply uncheck the box next to the application name.
This action supports multi selection
This means you can select multiple users, and don’t have to assign users one at a time.
Search and filter
In order to ease users assignation management, a search bar is available as well as a filtering button, allowing you to show only users, or only groups.
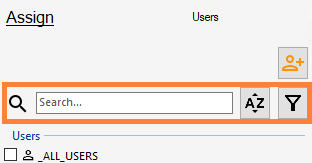
You can also use the filter button so that only assigned/unassigned applications (or assigned/unassigned users if you switch view) are shown.
This will help you manage your assignations in case you have either lots of users having applications assigned, or simply lots of published applications.
Restrict Users to Specific Applications
- Log in to the TSplus Admin Console.
- Go to Users, select the target user.
- Set their session mode to RemoteApp only (disable Full Desktop access) under session/security settings.
- Go to Application Publishing and, for each application, use the Users/Groups security settings to grant access only to the intended applications.
- Ensure the user is not included in any group with broader (desktop or all-app) access.
- Save changes.
- Test by logging in as the user — confirm only the assigned applications are visible, with no desktop option.
Configure Multiple Applications for a User
- Log in to the TSplus Admin Console.
- Go to Application Publishing.
- For each application the user needs:
- Open the application's Properties/Security settings.
- Add the user (or their group) under Users/Groups.
- Repeat for all required applications.
- Alternatively, if using groups, add the user to a group that already has access to multiple applications — this can be faster than assigning app-by-app.
- Click Save/Apply after each change.
- Have the user log out/in or refresh their portal to confirm all assigned applications appear together in their session.
Related Articles
Session Management
Overview TSplus allows administrators to publish individual applications or a full remote desktop to end users without granting them a traditional Windows login. Instead of managing full remote sessions for every user, admins can control exactly what ...Installation and Configuration
Installation Run TSplus Remote Access Setup program and then follow the installation steps. Your local administrator password is required after the first restart of TSplus Remote Access. You can then select your language (possible to change it later) ...Printing and Redirection
Universal Printer (novaPDF) The TSplus Universal Printer allows you to preview or print documents from any PC or mobile device supported by TSplus Remote Access. Universal Printer is relevant from an HTML5 session and when connected using a generated ...TSplus Troubleshooting
Overview This category provides troubleshooting guides for common TSplus issues, including login failures, web portal and HTML5 client problems, published application errors, session disconnects, performance issues, licensing errors, redirection ...Security
Overview This category covers the essential security features in TSplus, including two-factor authentication, access restrictions, brute-force protection, password policies, security logs, and web portal security to help protect your remote access ...